(UPDATE: Edited 5-5-2013 I’ve had some feedback and questions about this pattern so I’ve edited it to include a lot of images and descriptions. You can click on any picture for an enlarged view also. Hopefully this will all be very clear now. The written pattern by itself (for those that don’t need the pictures, and for ease of reading) is at the very bottom of this post. I’ve had one too many requests for a video instruction for rows 2 and 3 of the body of the glove. Just so you know, making a video is not as easy as it would seem to be. That said, welcome to amateur hour with my camera’s finicky focus and don’t mind that I was still talking at the end of the video and forgive when I get off camera. Enjoy the sounds of happy kids in the background and feel free to skip through to the point you’re looking for, because it’s long. Hope this helps! I love that so many people have used this pattern and love it and come back to it. Thanks!*
At last I’m blogging one of my very favorite and most popular glove patterns! Thanks for your patience in waiting for this and enjoy! If you’re interested in ordering a pair of these check out my store. I’m happy to do custom color requests!
Twist Fingerless Glove
pattern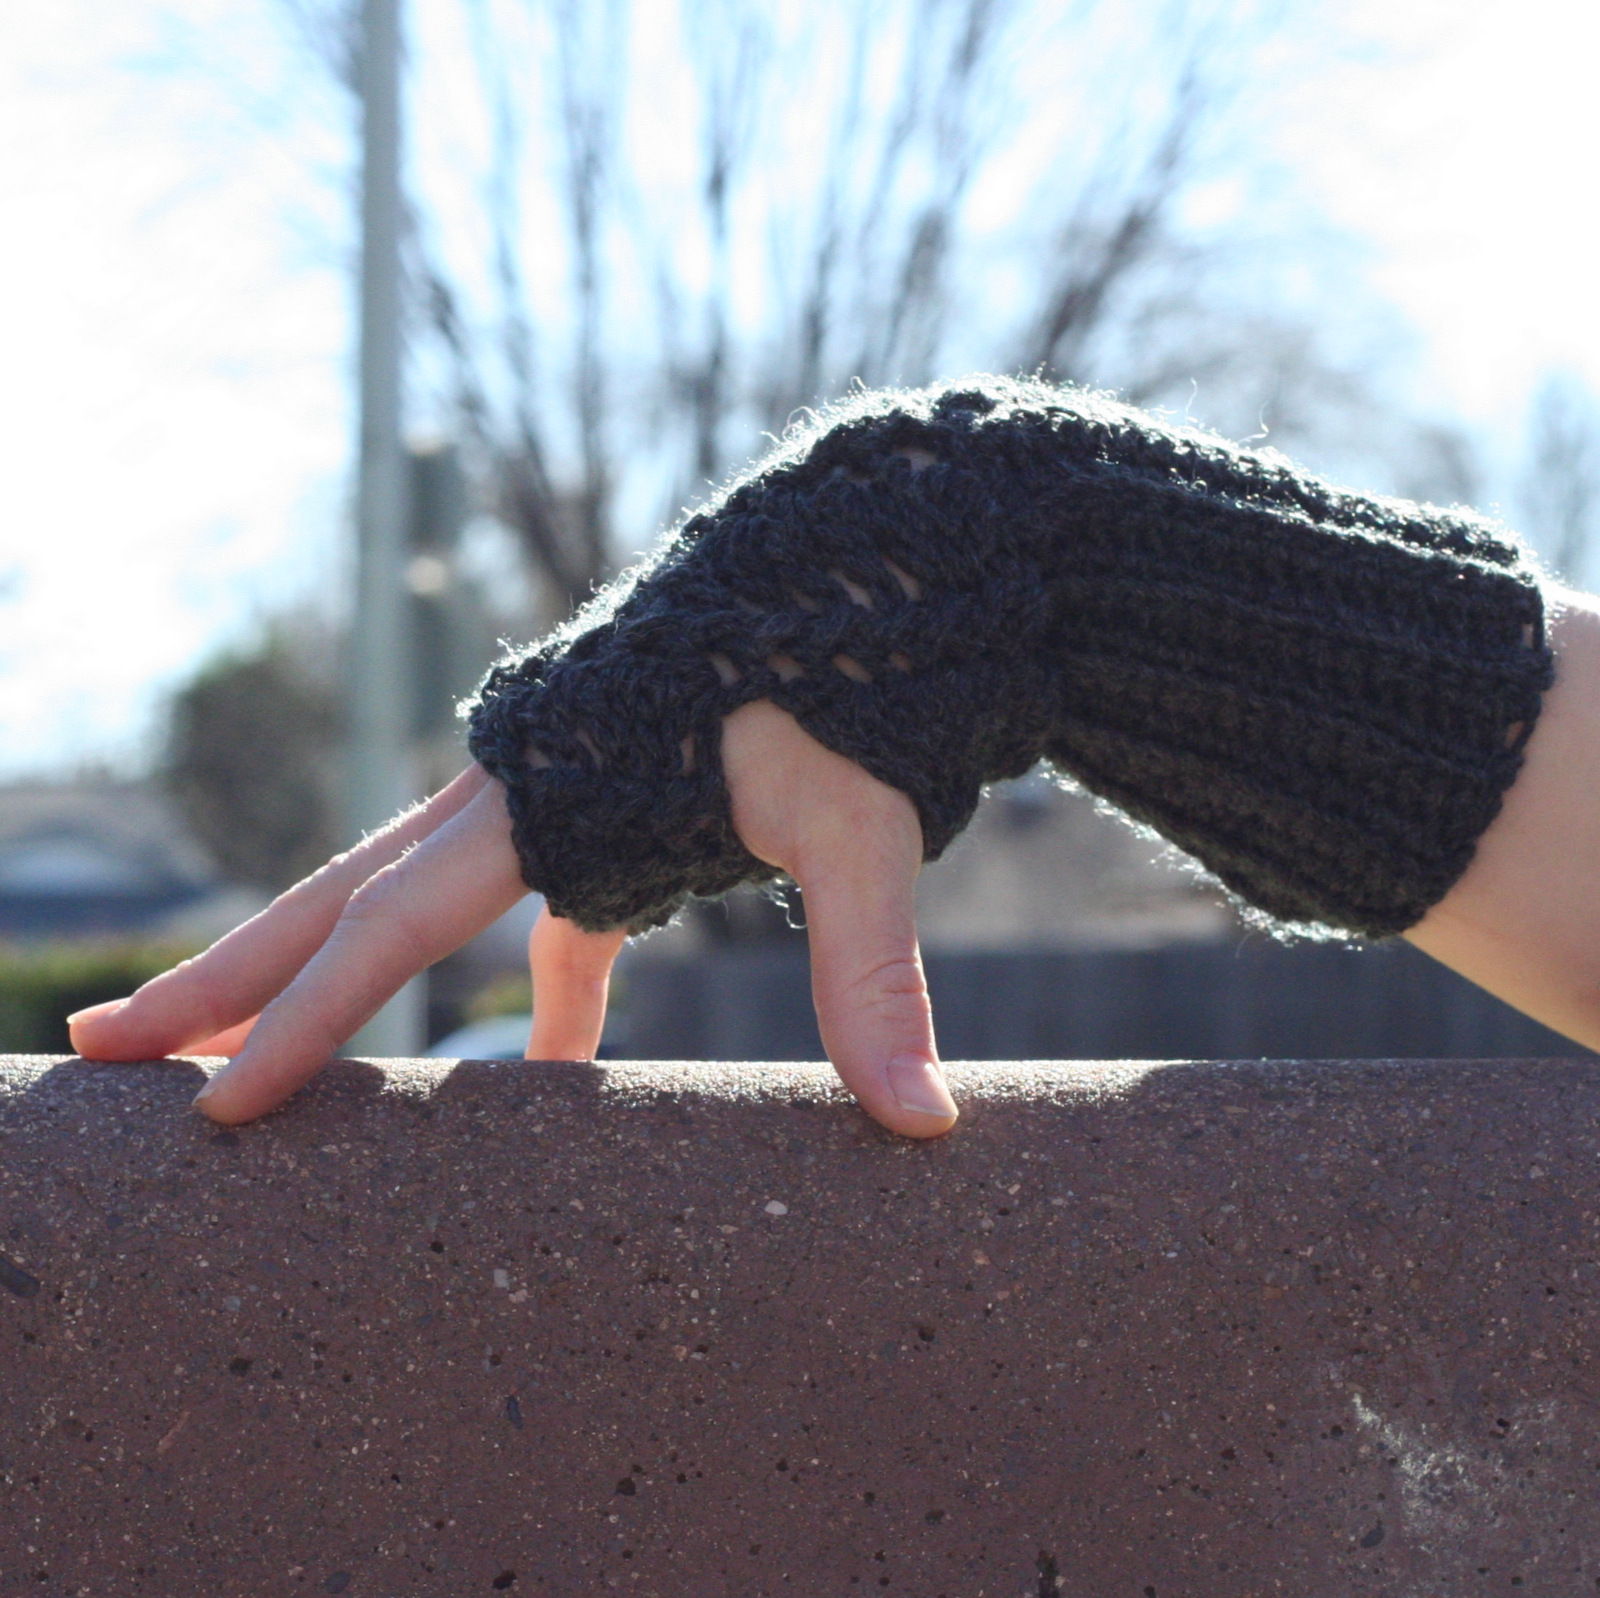


For this pattern you’ll want to be (or get) familiar with:
blo=back loop only
fpdc=front post double crochet
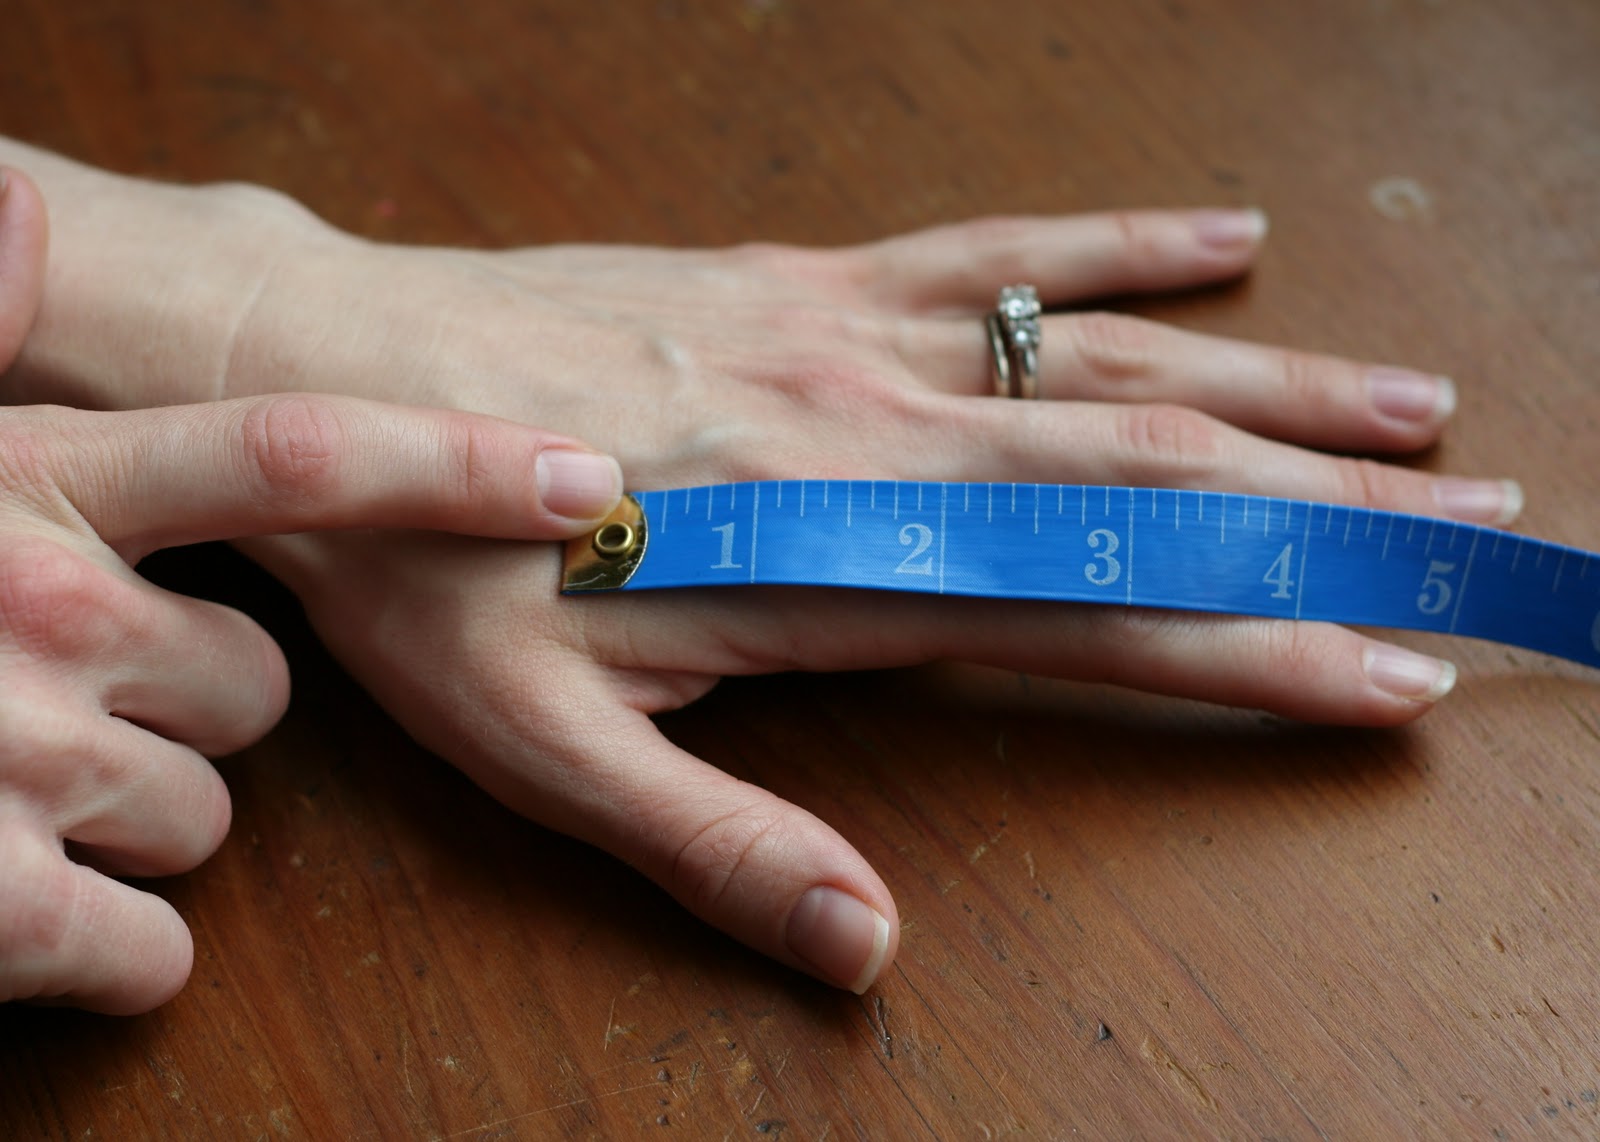
I used Caron Country Merino wool blend yarn and a size I and size J crochet hook for the dark grey pair. I reused a second hand yarn for the green pair but I’m guessing it was about a 2-ply sport weight yarn and I used a size G and size H crochet hook with it. You can use any weight yarn with a slightly large hook (and optionally the larger hook too for the top of the glove) for the yarn you’re using. The larger crochet hooks help keep it stretchy. Gauge isn’t important because you’ll make the gloves to fit.You will need a few measurements or you can just measure the gloves against your hand and arm as you go. The second method actually works best for me… plus I try them on at each step. Then you can get the right tightness/stretchiness feel. Keep in mind these gloves are very stretchy so you can make them a little on the small side, just don’t make them too big.


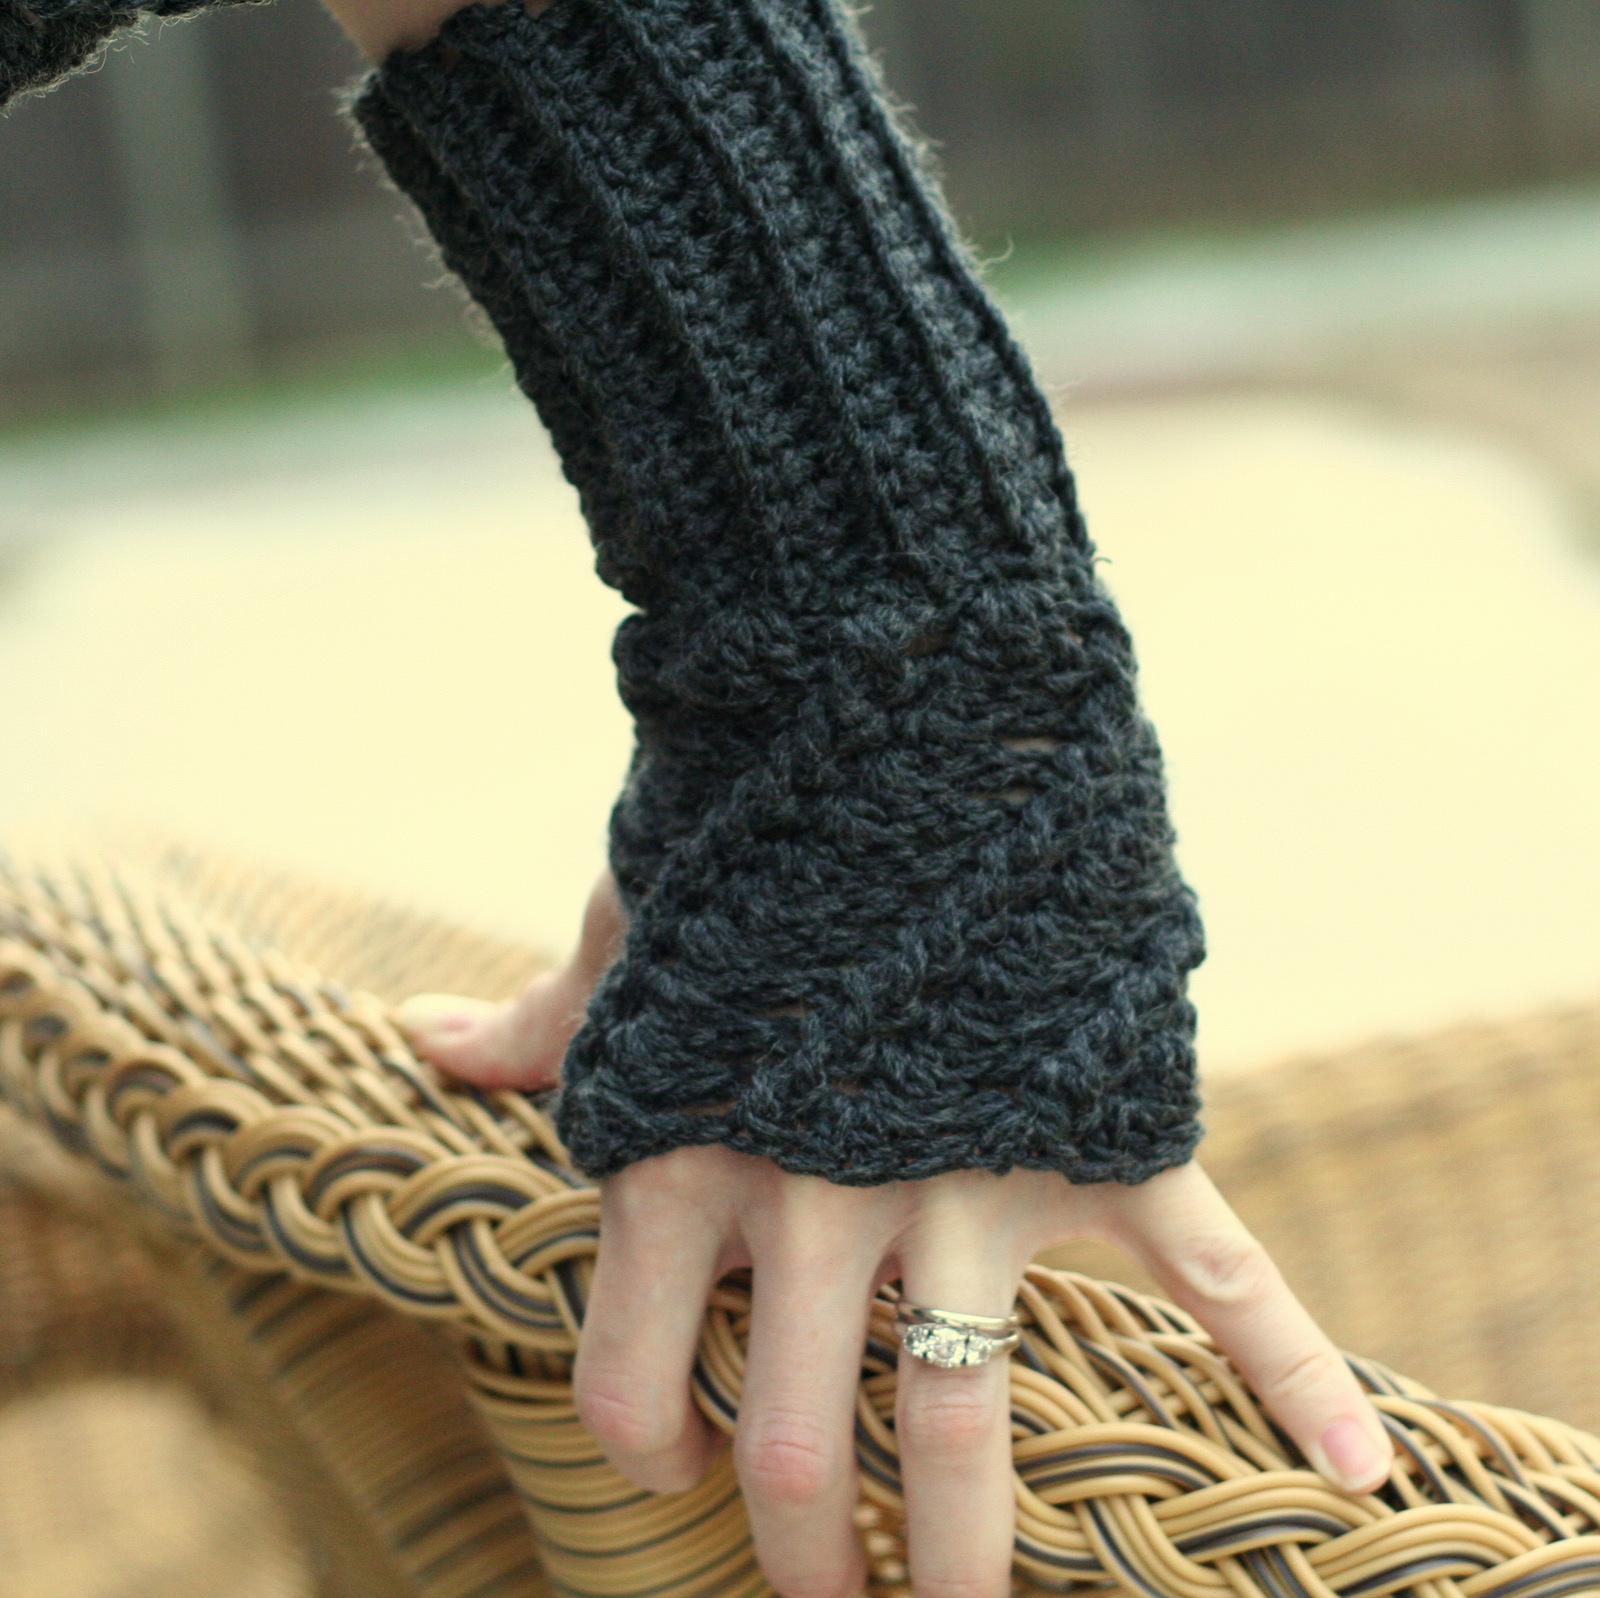
Cuff- The cuff is a basic 1:1 ribbing.
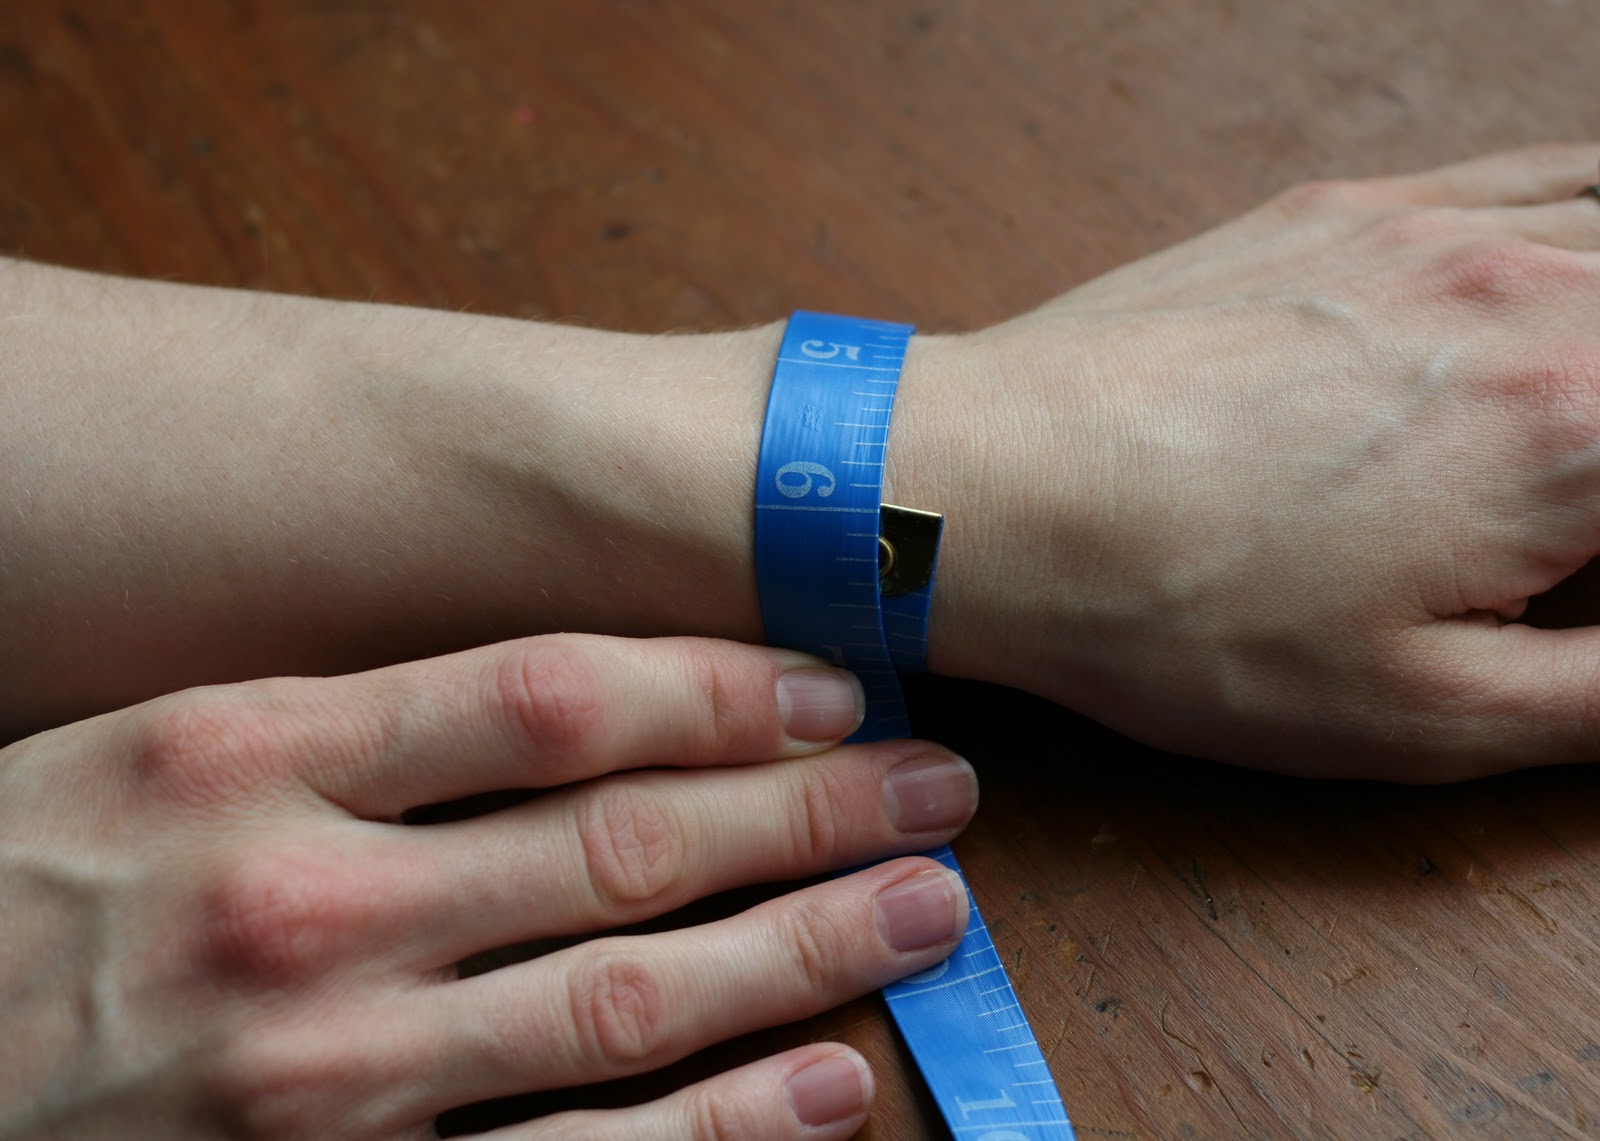
Ch (with your smaller hook) until you reach the approx. length for the first measurement plus 1 more chain. (I chained 19)
Row 1: sc blo in 2nd ch from hook and each ch accross, ch 1, turn (18 total sc, for me)
Row 2: sc blo in each, ch 1, turn
Row 3-?: Repeat row 2. How many rows you make will be determined by the second and third measurements shown above. It should fit around your wrist without gapping but be able to stretch to around the top of your hand (so you can get it on.) I had 24 rows.
You will end up with a square/rectangle shaped piece. ch 1, turn. For the body you will be working along the side of the cuff.

Body-
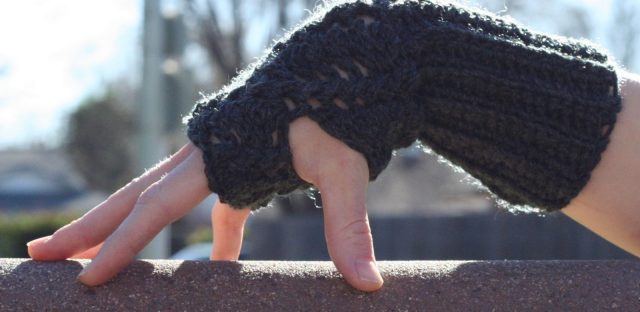
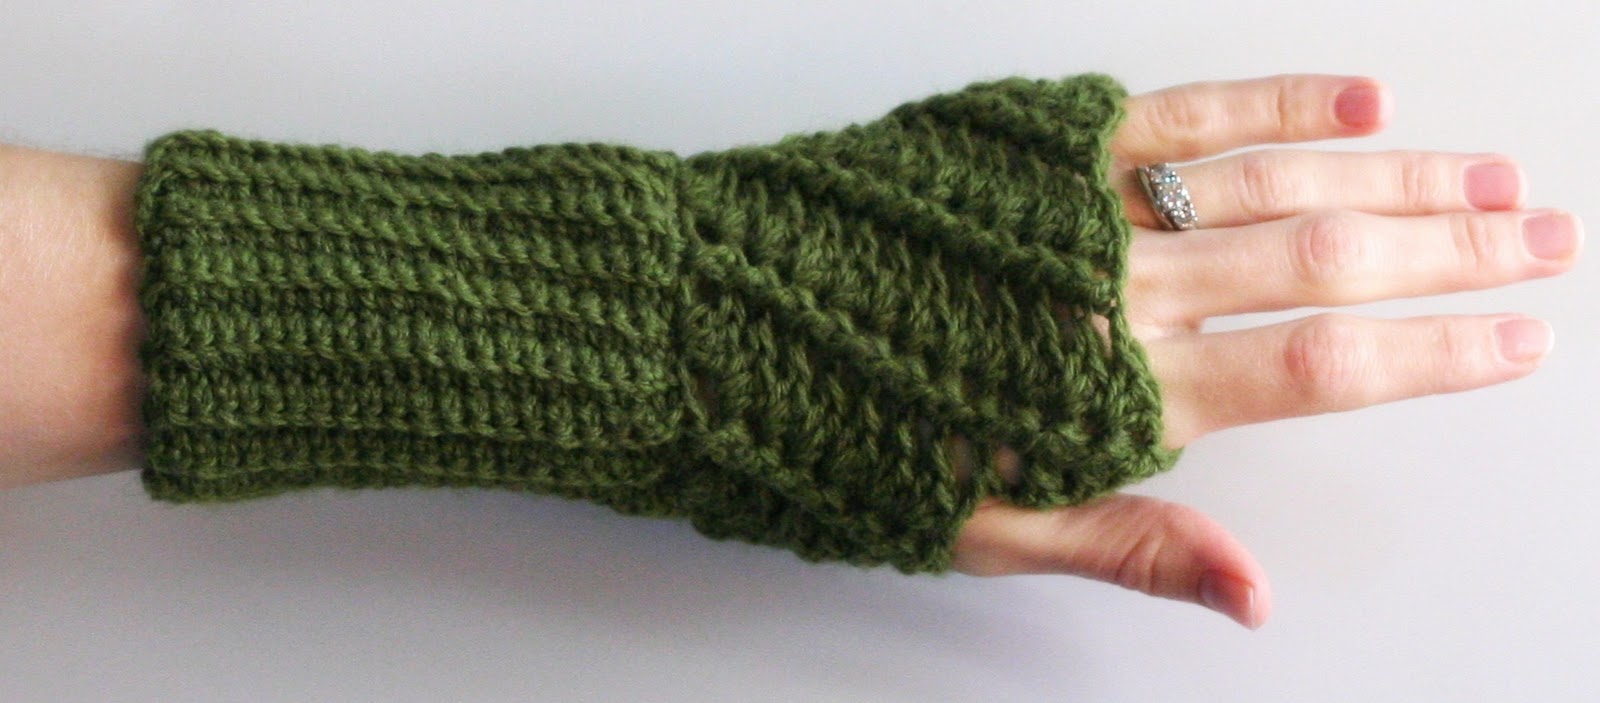
Row 1: Working in the side of the ribbed cuff, sc across (see pic below). How many sc you need is determined by your measurements but it must be a factor of 5. You want it to fit nicely around your wrist (measurement #2) but be able to stretch over the top of your hand so you can get it on (measurement #3.) I had 25 sc total. Fold in half to begin working in the round and Join with sl st to first sc of this row (see 2nd pic below.)


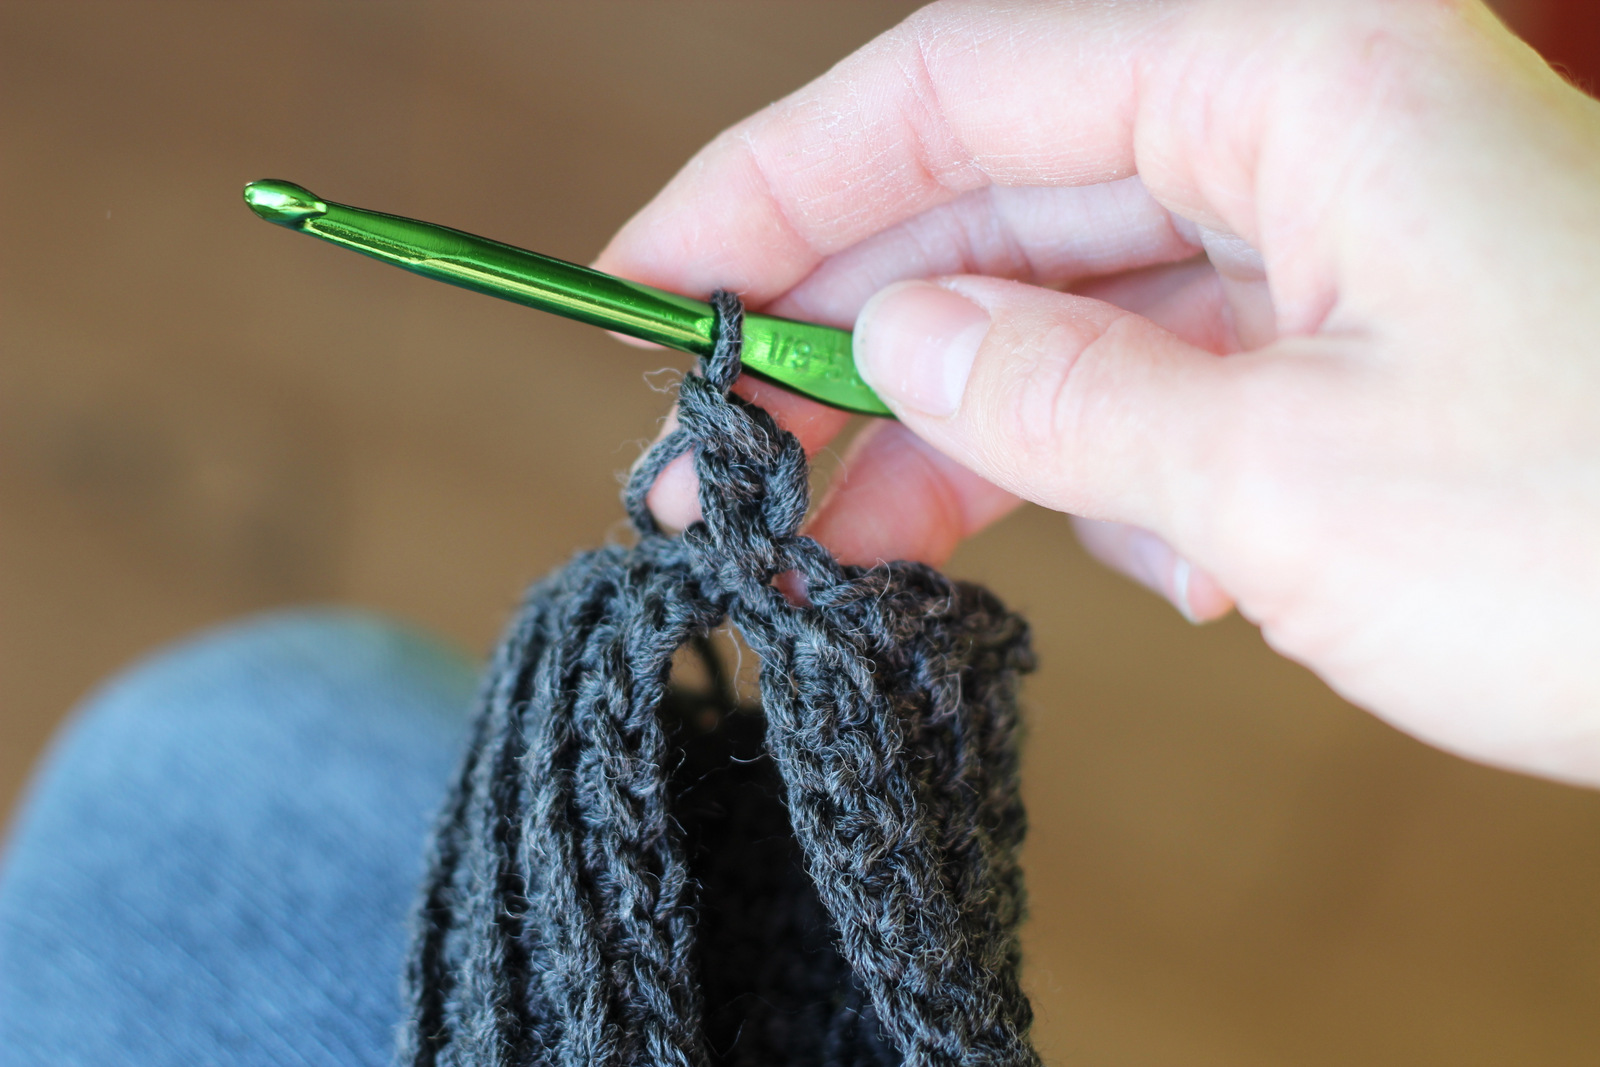
Row 2: ch 3, make beginning twist (dc in sc behind where you just joined-see pictures below), sk 1, 3dc in next (shell)

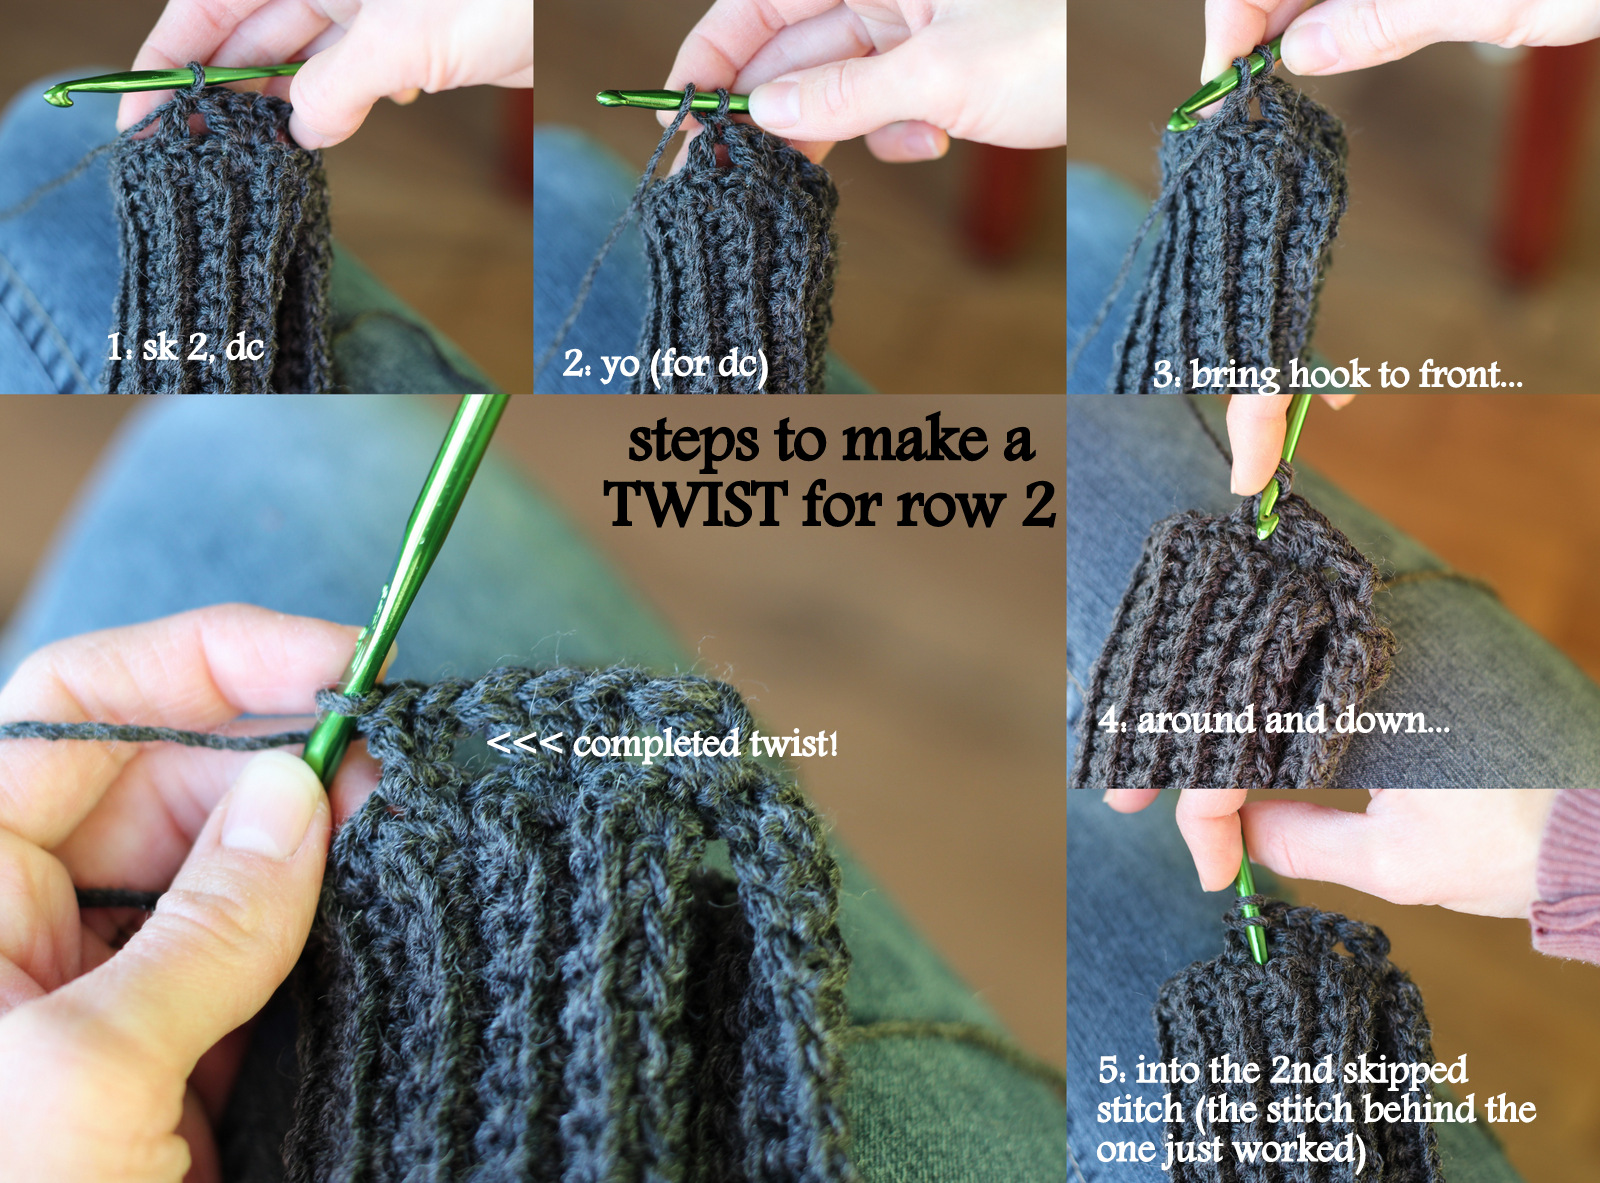
*Make twist (see picture below- sk 2, dc, dc in 2nd skipped stitch), sk 1, 3dc in next* Repeat around, (5 twists and 5 shells total)
Row 3: beginning twist stitch (see picture below- join with sl st around starting dc from row 2, ch 3, fpdc around the ch 3 of below row),
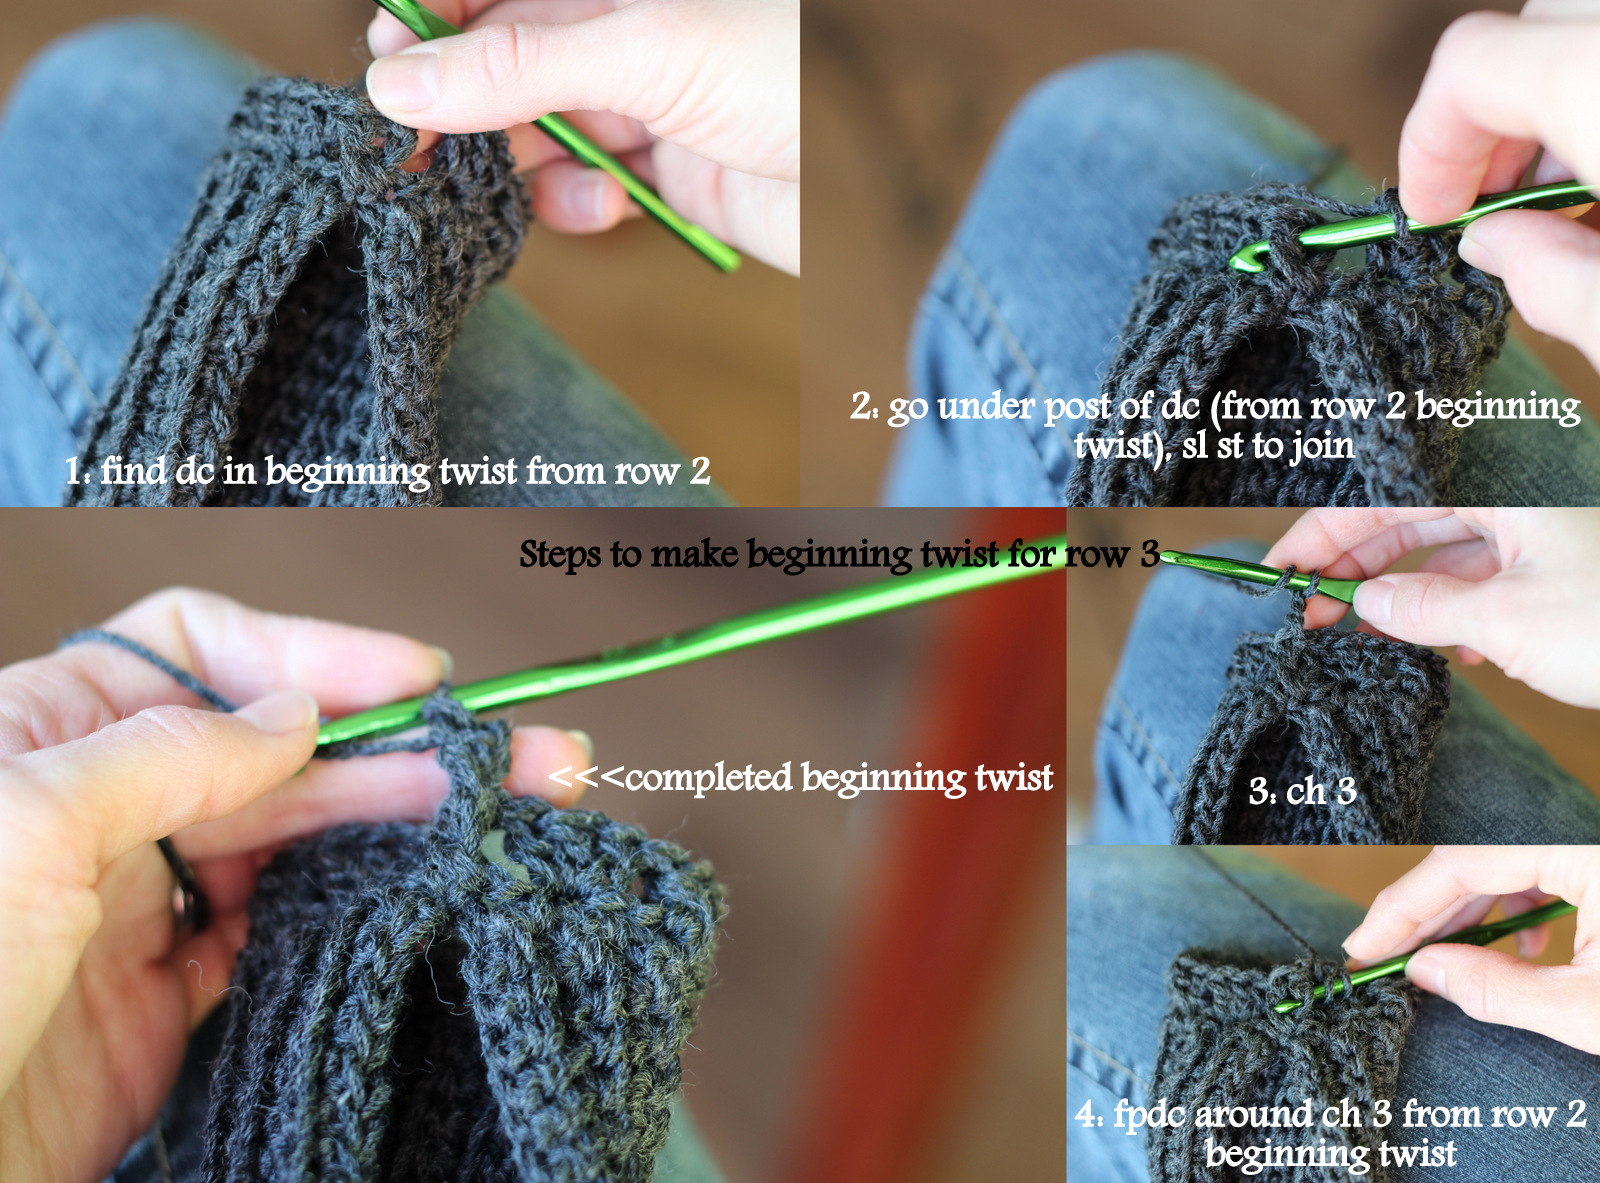
shell into the space before the next shell (see pictures below)
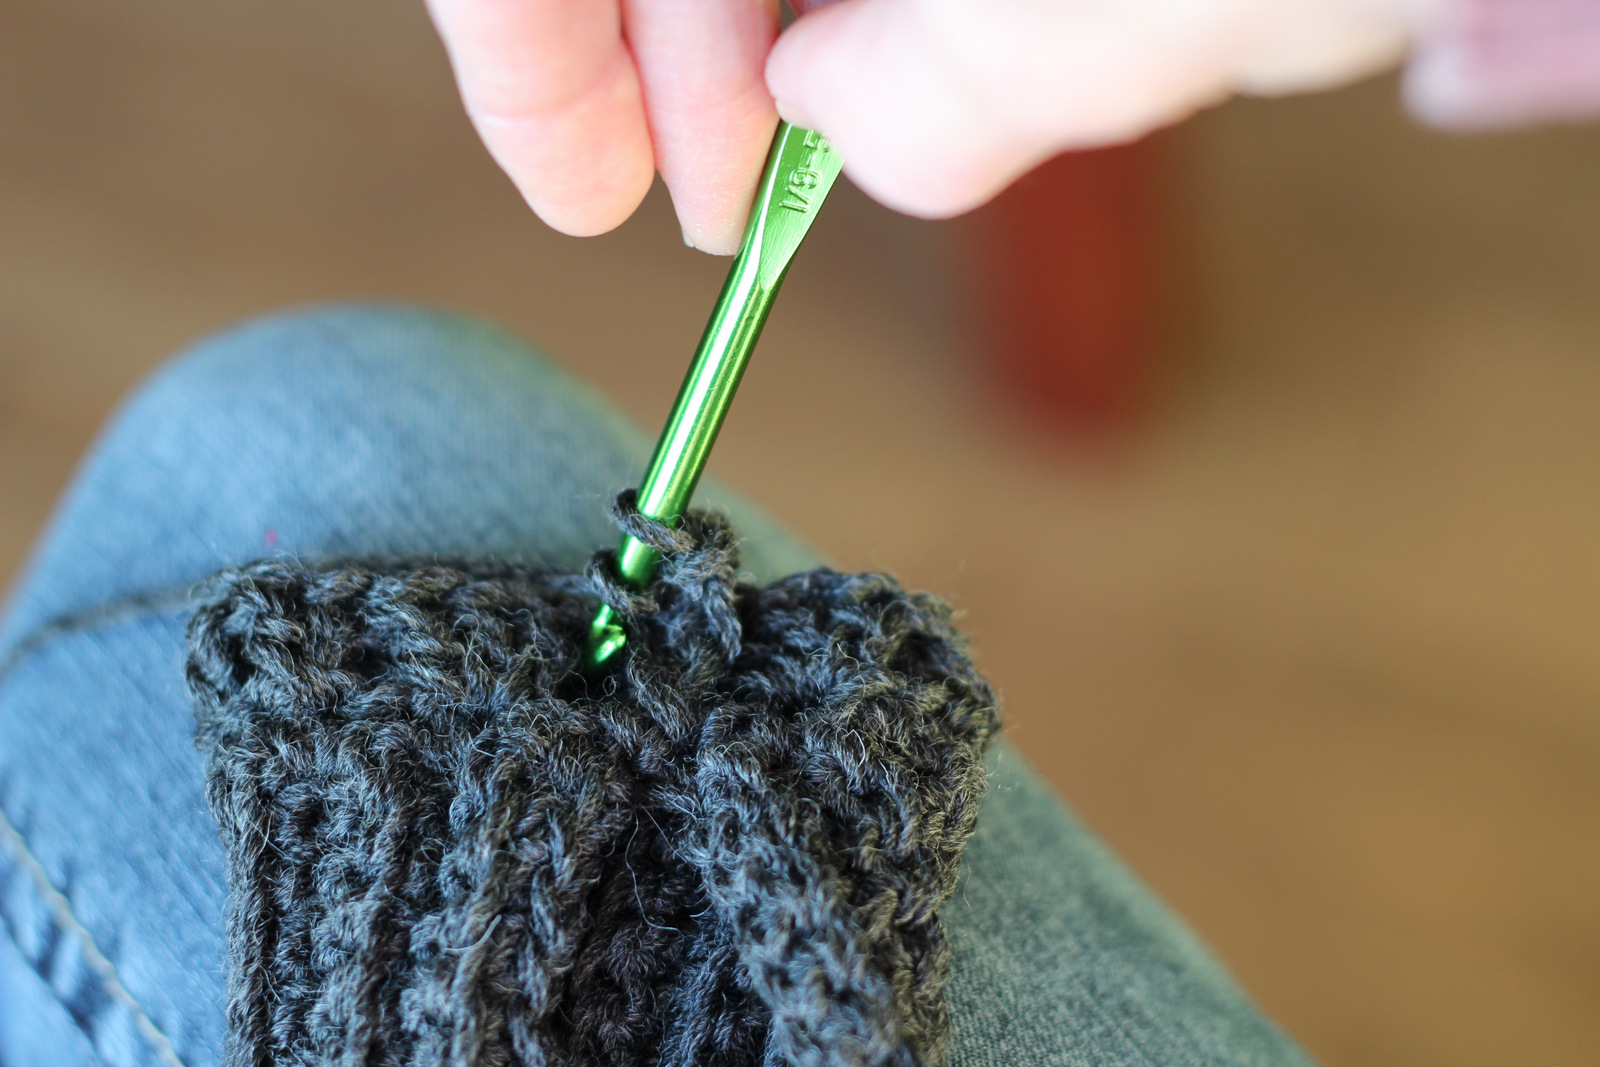
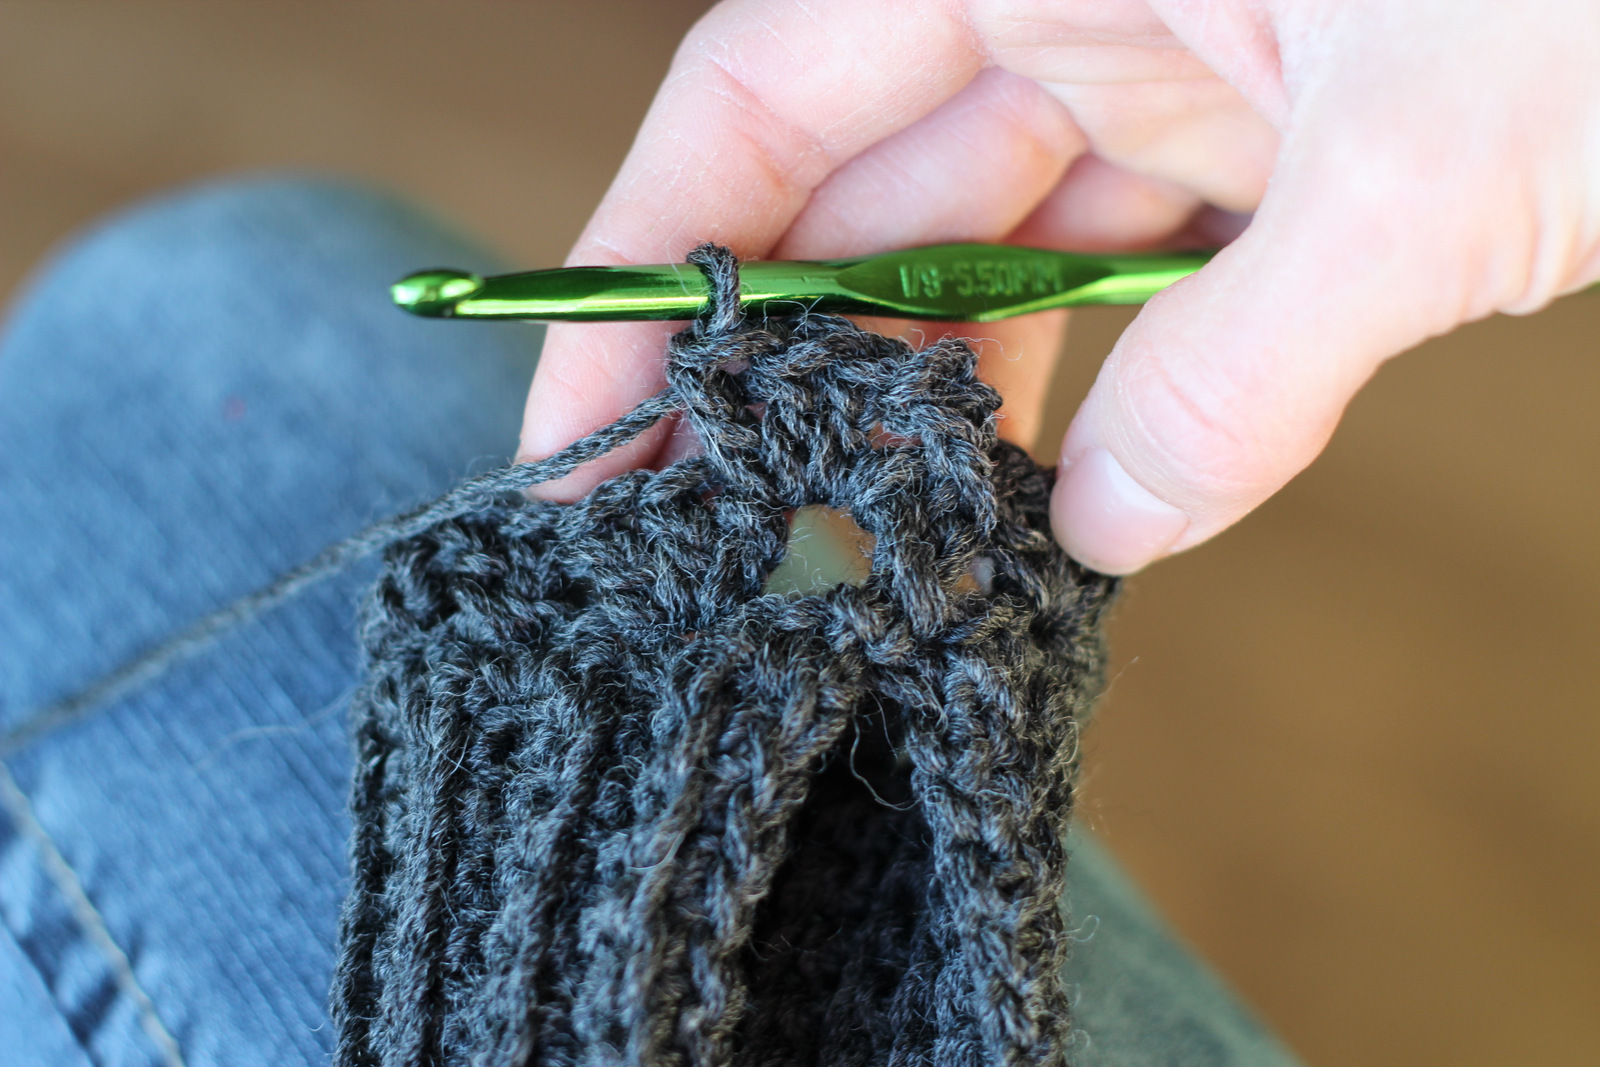
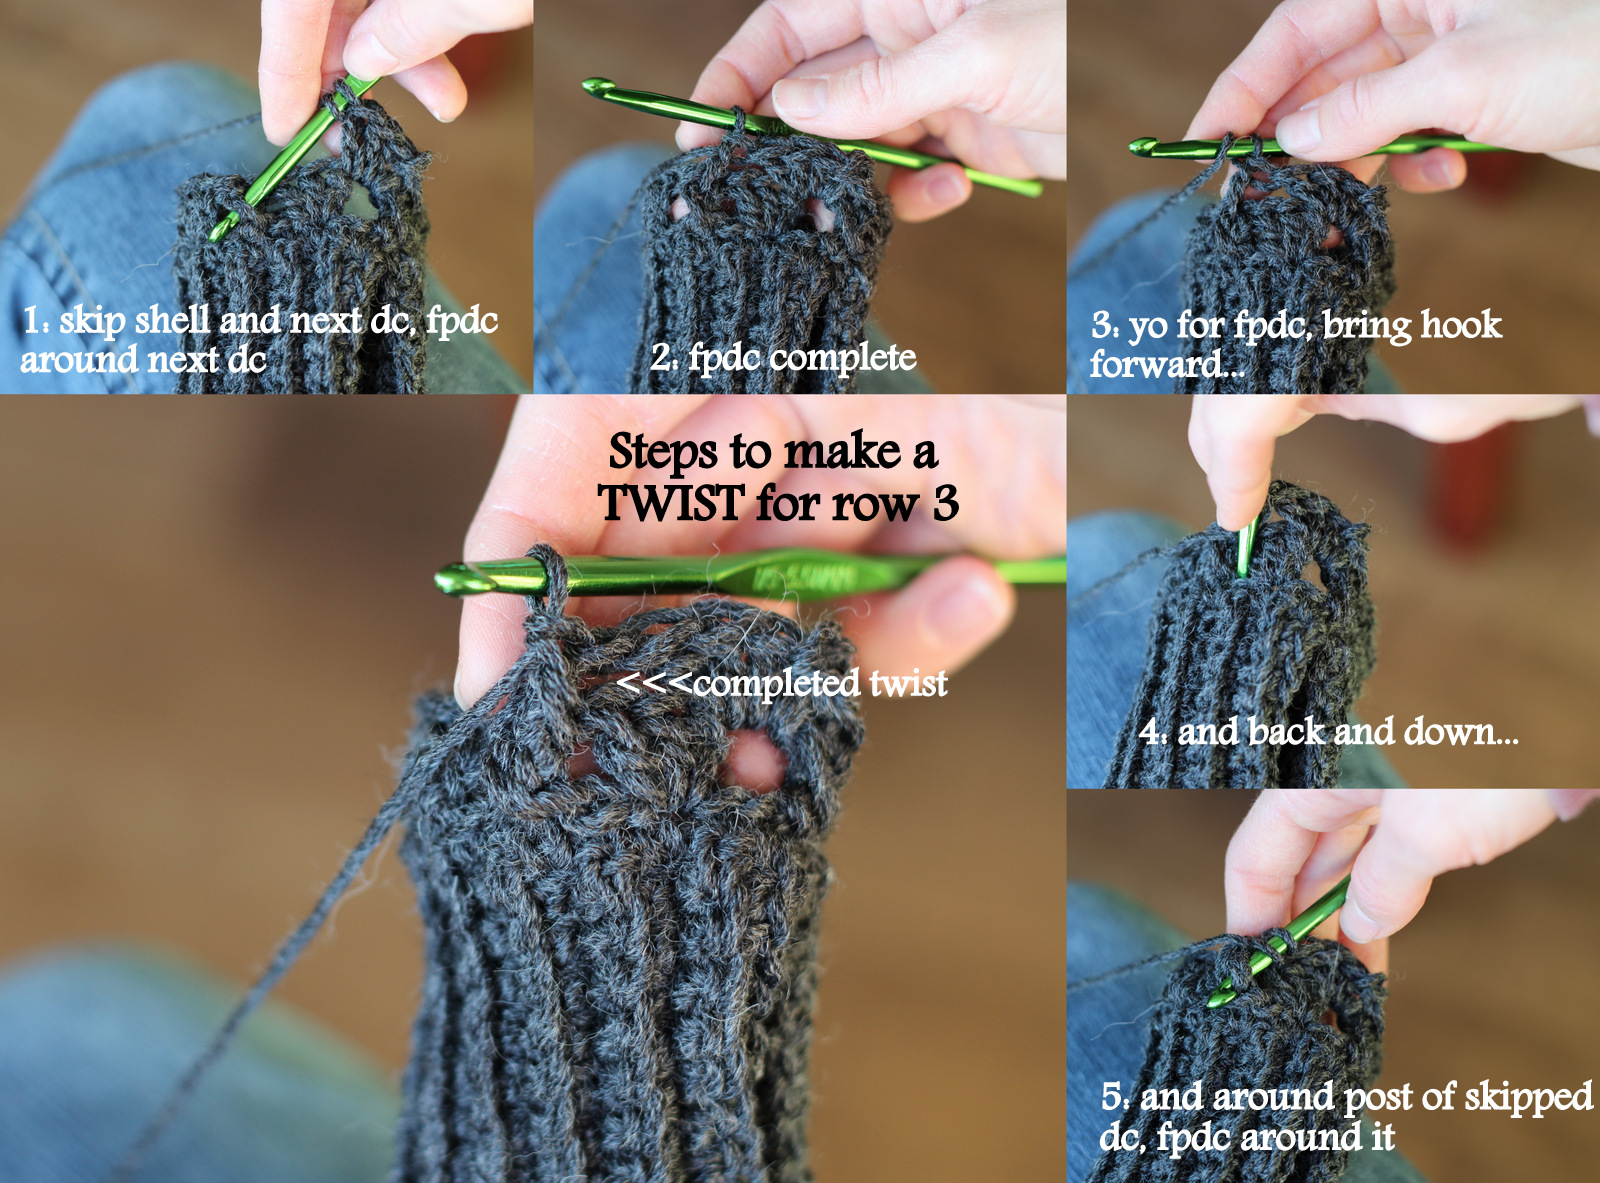
*twist in next twist (keeping a tight tension, sk the shell and sk next dc, fpdc around next dc, fpdc around skipped dc- see pictures below) shell in space before next shell* repeat around, join with sl st around the post of the first dc. In other words, for this row and each row after, you will be twisting in each twist and working a shell in the space before each shell.
Row 4-? (row 6 for me): Repeat row 3 until you get to the row where you’d like to work your thumb hole. Use measurement #4 to help determine this. You may want to switch to your larger hook 1-2 rows before your thumb hole row.
Thumb hole row (row 7 for me): work a beginning twist stitch (like in row 3 and on: join with sl st around dc from row below, ch 3, fpdc around ch 3 of below row) dc in space before next shell, ch 6, sk the shell and the next twist, dc in space before next shell, *twist in next twist, shell in space before next shell* repeat around, join with sl st around the post of the first dc
Row after thumb hole row (row 8 for me): ch 3, fpdc around ch 3 of below row, shell in space before dc, sk 3, dc, dc in 2nd skipped ch, sk 1, shell in next ch, *twist in next twist, shell in next shell* repeat around, join with sl st around the post of the first dc
Next row and until top (Row 9-11 for me): Repeat row 3, finish off, and sew the cuff up. Oh, and don’t forget to make another one for the other hand!
Twist Fingerless Gloves-text only
patternCuff- The cuff is a basic 1:1 ribbing.
Ch (with your smaller hook) until you reach the approx. length from measurement #1 plus 1 more chain. (I chained 19)
Row 1: sc blo in 2nd ch from hook and each ch across, ch 1, turn (18 total sc, for me)
Row 2: sc blo in each, ch 1, turn
Row 3-?: Repeat row 2. How many rows you make will be determined by measurement #2 and #3. It should fit around your wrist without gapping but be able to stretch to around the top of your hand (so you can get it on.) I had 24 rows.
You will end up with a square/rectangle shaped piece. ch 1, turn. For the body you will be working along the side of the cuff.
Body-
Row 1: Working in the side of the ribbed cuff, sc across. How many sc you need is determined by your measurements but it must be a factor of 5. You want it to fit nicely around your wrist but be able to stretch over the top of your hand so you can get it on. I had 25 sc total. Fold in half to begin working in the round and Join with sl st to first sc of this row.
Row 2: ch 3, make beginning twist (dc in sc behind where you just joined-see pictures below), sk 1, 3dc in next (shell) *Make twist (sk 2, dc, dc in 2nd skipped stitch), sk 1, 3dc in next* Repeat around, (5 twists and 5 shells total)
Row 3: work a beginning twist stitch (join with sl st around dc from the beginning of row 2, ch 3, fpdc around the ch 3 of below row), shell into the space before the next shell, *twist in next twist (keeping a tight tension, sk the shell and sk next dc, fpdc around next dc, fpdc around skipped dc- see pictures below) shell in space before next shell* repeat around, join with sl st around the post of the first dc. In other words, for this row and each row after, you will be twisting in each twist and working a shell in the space before each shell.
Row 4-? (row 6 for me): Repeat row 3 until you get to the row where you’d like to work your thumb hole. You may want to switch to your larger hook 1-2 rows before your thumb hole row.
Thumb hole row (row 7 for me): work a beginning twist stitch (like in row 3 and on: join with sl st around dc from row below, ch 3, fpdc around ch 3 of below row) dc in space before next shell, ch 6, sk the shell and the next twist, dc in space before next shell, *twist in next twist, shell in space before next shell* repeat around, join with sl st around the post of the first dc
Row after thumb hole row (row 8 for me): ch 3, fpdc around ch 3 of below row, shell in space before dc, sk 3, dc, dc in 2nd skipped ch, sk 1, shell in next ch, *twist in next twist, shell in next shell* repeat around, join with sl st around the post of the first dc
Next row and until top (Row 9-11 for me): Repeat row 3, finish off, and sew the cuff up. Oh, and don’t forget to make another one for the other hand!
♥♥♥ it!!! thank you so much for your patience and pattern!!! i cant wait to try it out myself!!! (they’ll make great gifts!!!)
Trying to make these–row 3 of the body is very confusing to me–do I do fpdc in one of the double crochets of the shell? are the twists lining up with the twists of the row below or am I making a new twist in the double crochets of the shells? don’t see any shells in the completed gloves but can’t figure it out! Help, please
Sorry, Diane for the trouble! And thanks for the feedback! I edited and added some more detail that should help you figure it out. You use the fpdcs to make twists in each twist… and shell in the space before each shell. You don’t work anything into the shells, just before them. You can blow up the pictures by clicking on them. If you look between two twists you will see a shell that looks stretched out and pulled sideways. Hope that helps. Let me know with any other questions!
I was wondering how much yarn you used? I know it will be different for everyone since the glove is made according to your own measurements but I was curious as to how much it took to make your pair. Thanks!!
Sorry, not sure how much yarn they took. Less than a skein per pair though…
I’m on my fifth pair of these–GREAT PATTERN! I have six daughters and they are going to love these for Christmas!
Yay! Glad it’s getting such good use and will be enjoyed! Thanks for the feedback. 🙂
This comment has been removed by the author.
Thank you for posting this!! Love it!!! Just an idea that may be helpful for beginners like myself – this may just be a “duh!” for all of you who have been doing this for a while, but – I left a long tail at the beginning to use to stitch it closed. I am so not a fan of weaving in ends, so I try and find ways where I don’t have to and at least this takes away one end!
Also – couple questions… These are probably basic knowledge.. but
– When you say to sk2, dc – Does that mean to dc in the 3rd stitch or in the 2nd of the sk2?
– With the twists; I just want to make sure I’m doing it right, when you say *sk the shell and sk next dc, fpdc around next dc, fpdc around skipped dc (twist), shell in space before next shell* – the part where you fpdc around skipped dc, would you be stitching into the one thats on top or behind? —- I hope this makes sense!! Thank you!!
I was so excited to find this pattern!! Although I’m still having trouble with the twists.. they don’t look “twisty”. On the first fpdc do I wrap it around the “front” post of the twist? I’m kinda new to crocheting and mine is just not looking like yours. 🙂 Thanks!
Good tip, My Heart in Denver, I don’t like weaving in any more ends than I have to either!
“sk 2, dc” does mean to dc in the 3rd space.
When you are working a twist you fpdc around the post (bar) of the “front” stitch of the twist below. Then you put your hook to the right of that stitch to fpdc around the “back” stitch of the twist below… When I say “sk next dc, fpdc around next dc, fpdc around skipped dc” I am looking at the top of the stitches to see which is next. Hope those two ways of looking at it help!
If it doesn’t help maybe you can send me a link to a picture of your work and I can get a better idea from that?
Hola. Gracias por el tutorial de los guantes. Este invierno he hecho unos cuantos guantes pero cuando vi tu modelo en Pinterest me gustó la idea de los puños. He hecho unos basándome en tu modelo, el patrón es diferente. En mi blog lo puedes ver.
Un saludo.
Susana.
Thanks a lot for posting this!!! I was looking for a pattern like yours for a long time ago. Sorry for my english, I’m from Lima, Peru, but I want to express my gratitude!.
these look fantastic!
I’m a new crochet-er and I just can’t seem to make sense of this stitch. Can you please clarify this row for me? When you say “dc in sc behind where you just joined” which stitch is that? Is that to the left or the right of the chain you just made if you are a right handed crocheter?
Row 2: ch 3, dc in sc behind where you just joined, sk 1, 3dc in next (shell), *sk 2, dc, dc in 2nd skipped stitch, sk 1, 3dc in next* Repeat around, join with sl st around the post of the first dc of this row (5 twists and 5 shells total)
When I say to “dc in the stitch behind” it means the opposite direction than the “next” stitch that you would usually crochet in… So if you are right handed, it will be the stitch to the right of the join and chain. Hope that helps!
Hello,
I was looking for a model of fingerless Glover in French but I finally fund this one in English. I have made them but with some changes. I am interested by putting nine on my blog with explanations in French but as I started from your model, I don’t want to do it without your authorization.
Sorry for my poor English.
Thanks for your answer.
Palmira
Yes, you are welcome to blog about it and link back to me and explain your changes. Glad you enjoyed the pattern!
Hi Bethnay,
Thank you so much for this pattern. I am confused with the instructions below:
Row 3: ch 3, fpdc around the ch 3 of below row (first twist), shell into the space before the next shell (see pic to the right- you can enlarge the pic by clicking on it), *sk the shell and sk next dc, fpdc around next dc, fpdc around skipped dc (twist), shell in space before next shell* repeat around, join with sl st around the post of the first dc. In other words, for this row and each row after, you will be twisting in each twist and working a shell in the space before each shell.
When you are doing a fpdc; are you doing over the whole shell (3dc) or each individual dc in the shell? With the sk the shell and sk next dc, fpdc around next dc; I end up with huge gaps in my work. Any help or suggestions would be greatly appreciated.
Thank you,
Lena
Hi, Lena. The fpdc are not done in the shells at all. You will have gaps. I try to keep my tension tight as I skip the shell and 1st DC and that helps some. The gaps are part of the pattern and if you keep a good tension there when you are done and put the glove on the gaps will close some as it stretches around your hand. Hope that helps.
Hi Bethany,
I just can’t make heads or tails of Row three. I’ve read the comments but I just keep getting more confused. Could you perhaps try to explain it once more? I am a beginner and so I need it spelled out a bit more hahaha. For example, I have a feeling I’m supposed to be crocheting backwards sometimes!?!? I’m supposed to shell sometimes but not others? I understand I am skipping stitches but, I can’t tell when and how many stitches I am skipping. I’ve tried reinterpreting the instructions a few times but I am just not getting it. Thank you in advance!!
Erin
Hi, Erin. Are you familiar with fpdc, twist stitches (also called criss cross stitches,) and crocheting into spaces? This is one of my more complicated patterns I know but I’m also not quite sure how to explain it any further than I have. I’ll think on it. Maybe you could search on youtube for fpdc and twist stitches and get more familiar with the concepts? I hope that helps some.
Hi, I’m stuck. I haven’t been crocheting for long, but in Row 2 Body, “*sk 2, dc, dc in 2nd skipped stitch, sk 1, 3dc in next*” I”m confused on the “double crochet in 2nd skipped stitch.” Does that mean to skip 2, dc, skip 2, dc, skip 1, 3dc, repeat?
Thanks,
Danielle
Apparently I need to post a video how to on this one. It’s tricky if you haven’t made twists (or sometimes called criss-cross or cable stitches) before. Let me try to re-say it. Otherwise, for now, you can search on youtube for a video showing some of the terms I said above. You skip 2 stitches first. You dc in the next stitch. Then you go back to that 2nd of the two stitches you skipped just before the dc… you will dc in that 2nd skipped stitch to make your dc twist in front of the other one.
So, no, it does not mean to sk 2, dc, sk 2, dc, sk 2, 3dc…
You will use this same concept on the next rows. You will be doing fpdc twists where you sk a shell and a dc, do a fpdc around the next dc… then go back to that dc you skipped to do a fpdc around it. It’s a little awkward at first to do these twist stitches and a video really is helpful so I’ll try to get one up soon. Thanks.
Thank you so much for the pattern. Took a little time to figure out what you were telling us what to do, but, once my daughter and I figured it out I made them. It is actually easy once you get going. Will definitely make them again.
Love, love, love this pattern…tried it and will repeat over and over!
Love this pattern! So clear and easy to follow! I like to do a row of sc to finish off the the palm. It hold it nice and snug on the hand. Wonderful!
Ya this makes no sense at the body part… I think you need to look at the spot that talks about what you are skipping…
Fantastic tutorial! Thanks so much for sharing this! I linked to it on my blog this morning if you want to check it out: http://www.mooglyblog.com/10-crochet-fingerless-mitts-patterns/
Thanks!
Can you please post the original pattern as well. The way you have broken it down with all the photos interspersed has actually made the pattern a lot harder to read for people who don’t need all the beginner’s tips!
I actually used this pattern to make 3 pair of these for my family for Christmas, and now a few months have passed and I can no longer read your pattern!
Oh sorry! I did think of doing that but didn’t get around to it. Will do it tomorrow. Thanks for the feedback!
I’m a beginner. I took this real slow, watched 20 YouTube videos, and am still stuck on row 2 and 3 of the twist criss cross cable stich whatever it is. I haven’t found a single video showing this exact stitch and despite all the lovely pictures it just doesn’t make sense. Also the dark yarn used in pics make it hard to see the stich clearly. Any chance you could make a quick video? I would really appreciate it!
Done! See above, but don’t laugh at my video. It was not expert videography! Hope it helps you out.
Oh my gosh you’re an angel, thank you!! I was feeling so defeated, this being my first crochet project in at least 20 years, and I was utterly failing. I will check it out. Yay!!
I just loved your video, I thought you did a great job with it. I just wanted to keep crocheting with you up to the end. Whenever I had a doubt I would rewind and watch you slowly. Super helpful, thank you for taking the time.
I could even see a part two to this, showing the whole thumb process. It was actually fun to be crocheting along with your video 😉
Thanks! Glad it was helpful. I wouldn’t mind doing more videos once I get a better set up for it. This was very encouraging to me. 🙂
Hi Bethany!
These are so beautiful! Much more interesting than plain fingerless gloves. I was wondering if it would be okay if I make them for a charity. I’m part of a knitting group (I’m the only one who crochets!) and we make things to sell at an Oxfam charity shop in the UK – all the proceeds go to Oxfam of course. If this isn’t ok I totally understand! Thank you! 🙂
Yes! Please do make them for charity. Thank you and bless you. 🙂
Thank you!!! 🙂
I must say – one of the most difficult patterns ever! Kudos to you for creating something so gorgeous! I finally finished mine – after a few hours mind you.. But it was beautiful, the ripple along the length that forms is just gorgeous! Thank you!!
I’m a beginner but after the video I feel confident I can do this even if I have to watch it a bunch of times. You explained it VERY well , I get it! I sell bakery at our local farmers market and the booth next to me has yarn made from the lambs they raise. I couldn’t bring myself to spend the money on the wool, now I will.
How fun! Glad the video helped. Thanks for the compliment!
Once I saw the video it all became so clear! Thanks for your patience and generosity in sharing this great pattern! Made 2 already for me and my mom…my son wants a pair but I don’t know how to downsize it for such a small hand! Hes seven and a very small kid but wants them so he can ride his scooter…do you have any plainer (less frilly) patterns for boy fingerless gloves?
Thank you! And you are welcome too. 🙂 For a boy, I could probably use just the cuff pattern from this glove. Start out with your chain as long as you want the glove to be (forearm to knuckles.) Then sc blo back and forth until it stretches around his hand and arm nicely. I’d then sew the two sides together leaving a slit open for a thumb hole. The thumb hole would be vertical instead of horizontal but I don’t think that’s bad. If you didn’t like the raw edge at the top you could sc around it to finish it more. Hope that helps!
Thx 4 this pattern, lov it!! :*****
I’m totally confused by the thumb hole. I’ve got 2 with the 6 chain running between! The twist was easy.
You have 2 dcs with the ch 6 between them? Sounds right. Just make sure you skipped a shell and twist between as well…
No I’ve got 2 thumb holes ive pulled it out and re done this part about 10 times I’m totally lost!
Oh dear. Have you tried to watch the video? If you’ve got the rest OK you can skip to the thumb hole part.
I thought the video was just for rows 2 and 3 so never even looked at it. I’ll try that tomorrow or Saturday when I’m not so tired thank you
Hmm you are correct. I was not thinking there. The video won’t have the thumb hole. Do let me know how it goes for you next time and I can try to help describe more. Thanks for trying the pattern!
I’m confused about where to change hooks. Do I use my smaller hook until 1-2 rows before the thumb hole? Then I use my larger hook for the thumb hole row and the rows before it? Do I finish using my smaller hook?
You don’t have to switch hooks but it will help the fit if you switch 1-2 rows before the thumbhole row. Finish with the larger hook. Your hand gets wider right before your thumb so the extra stretch there is nice.
This pattern is beautiful and I’m really happy with the results on my first glove! The photos are very helpful. Now on to my second one! Will post to Ravelry when finished! Thank you so much!!!
I love this pattern! My only problem is that I’ve followed the video and I know it says repeat row 3 for rows 4-6 but my circles just keep getting smaller. What am I doing wrong?!?! I’m pretty new to crocheting but I feel like I understand the pattern..Help!
How is your stitch count? Can you identify by that where you are losing stitches? Or is your tension irregular?
I’m very confused about the thumb hole… I’m Spanish and my English is good but i don’t understand how i make the thumb hole… Why you don’t make a vídeo about this? I believe is very important and the most dificult!! Anyway thank you soo much for this pattern, is lovely!!
Thank you, Susana, for trying the pattern. I will look into making a video for the thumbhole rows. 🙂
Really this pattern is amaizing! Thank you for do this! I’m a lover of crochet and I very happy for find this pattern and free!!
When you have a video for thumbhole, the pattern turn perfect! And I finished the fingerless, are beautiful!!!
I’m stuck on thethumb hole do you think you can explain it a little better please. Thank you
I can try. 🙂 Eventually I will have a video up for it I hope. So, on the thumb row essentially you begin by working a beginning twist. In the place of the shell you would normally work next, you do 1 dc. You will then ch 6, skip where you would do your next twist and work 1 dc where you would usually do the next shell. This leaves a gap. Then just continue to work that row as the others. Hope that helps! Let me know!
I have that part it’s the row after that where I’m stuck
Ok. In the row above that you are doing the twists and shells directly into the chain… is that where you are?
I finally figured it out. Thank you for responding. I had to read it over again to understand what I was doing wrong
I’m glad you got it! Hope you enjoy the gloves!
I think I am doing something wrong 🙁 my first three rows of twists and shells are sooooo much larger than the cuff – is that normal?
They shouldn’t be significantly bigger. Check your numbers. If they are good, check your tension.
Hi Beth, can you explain your row 8 for me a little clearer please?! Esp overview the thumb hole. Thanks
Hi, Amanda. In row 3 you will work the stitches directly over the thumb hole into the chains specified. So it says how many to skip, similar to what you did in row 2 of the body. I hope that helps!
Great pattern, thanks! Made a pair in a green camo color for my boyfriend, and he freaking loves them! I did do a couple rounds of single crochet (w/ smaller hook) at the top, and a round of single crochet (again w/ smaller hook) around the thumb hole just to add stability.
Thanks so much for this pattern. I really love how easily customizable it is. I feel I could make these for any one of my family and friends. It actually taught me a few new techniques to make other styles for the men too. Thanks again!
Ok,,, this newbie is about to venture from the basics and attempt this fabulous looking pattern. Never done twist or shell stiches before and am hoping i wont have to rip out my work too many times 🙂 Ill check in when im done (could be awhile:) wish me luck everyone and good luck t
o you all as well. I imagine there is alot of hustling going on trying to get projects done before xmas. Kris
These were very easy to put together, I made a pair of boot cuffs to match, daughter loves them. Thank you very much for sharing them?