
The men in my family are always the hardest to shop for. Luckily for me, this year both of my brothers just moved into new apartments and one of them got really into cooking. I gave sort of a hybrid humorous housewarming and Christmas present. Camo colored hot pad holders. My mother came up with the idea for hot pad holders, I thought making them camouflage colored would make them manly, and my sister came up with the name “Bachelor Pads” for them. We work well together.
These take me way back because when I was a girl, this was the pattern I learned to crochet with. So, obviously it’s not my pattern, but it’s hard to track down where it originated. Here’s how to do what some people call the “Origami Hot pad” because of the neat folding trick at the end that makes a diagonal, double sided, thick hot pad.
I used some Sugar and Cream yarn because I wanted them to be cotton for cleaning. Each little skein made 1 hot pad (if you chain 35 to start it.) I also made a larger and smaller one (one by chaining 40 in the beginning and the other by chaining 30) and together they took 2 skeins. I’ve also seen some classic camo looking yarn that is acrylic by red heart.
Bachelor Pads
PatternChain 35 (Or whatever number you want. This will be the diagonal width of your finished square.)
Row 1: Turn and sc in 2nd from the hook and each stitch after that. At the end of the chain turn your work and sc down the chain again. By this I mean that you probably just sc’d in both the top loops of each chain… now you will sc in each of the spine loops of the chain. Hope that makes sense!
Row 2-? sc in first sc of Row 1 and each after. Keep sc’ing until the height of your piece equals 1/2 of the width. You can test this by doing the fold below and seeing if your fabric comes together at the end seam or if there’s still a gap. You want to end 1/4 or 3/4 the way through a row. You’ll see why below. It just positions your tail at a corner after the fold.
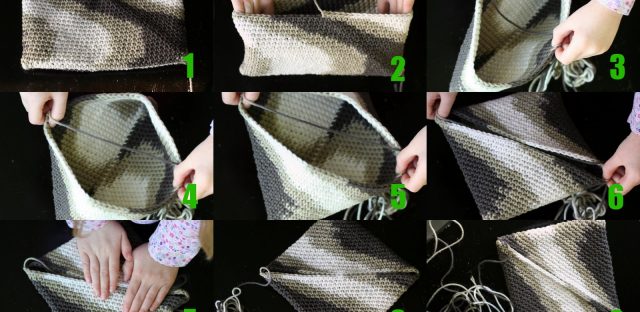
The Fold:

My hands are not that little/the hot pads aren’t that big! 🙂 This is my little helper illustrating while I photograph.
1. You can see that I ended in the middle of one side which works out to 1/4 or 3/4 of a row.
2. If you open it up you can see it’s like a pocket.
3. Grab the pocket in the middle of each side (at that 1/4 and 3/4 places so one of your hands will be on the tail.)
4. Pull out opening up the pocket…
5. Keep pulling at those two spots and push down…
6. It just kinda comes together as you keep pulling.
7. Flatten it down. If there’s still a gap you need to work another row or so. If there’s an overlap, you need to take some out. Now you’ll notice the tail is in one of the corners.
8. You did it! Not hard, right?
9. Sew it up with the tail. You’ll use the tail for the loop too so don’t chop it off yet.
The Loop:
I used the rest of the tail of yarn from sewing the seam and joined it to the corner with a sl st. Then I chained till I thought it looked good, joined it back to the corner with another sl st and turned to sl st’d back over the chain… and then of course sl st’d it back to the corner and finished off.
This is nice pattern. Thank u!
I make these too. Years ago my grandmother made me some. When she died my mom wanted me to take one of mine apart so I couldn figure out how to make them. Of course I said no, I’ve had the things 20 years and I’m not going to take them apart. But searching the net for several months I found the pattern and was able to make a bunch of them. It is my favorite pot holder. The double thickness is great and the only think I’ve found to melt them is a hot cast iron skillet set on them. Your’s are great! I’m sure they appeciated them.
That’s so neat! Want to try this for myself! Thank you so much for sharing!