
UPDATE 2-20-11: *The Droid Robot is available again at my store!* Drooooooiiid!
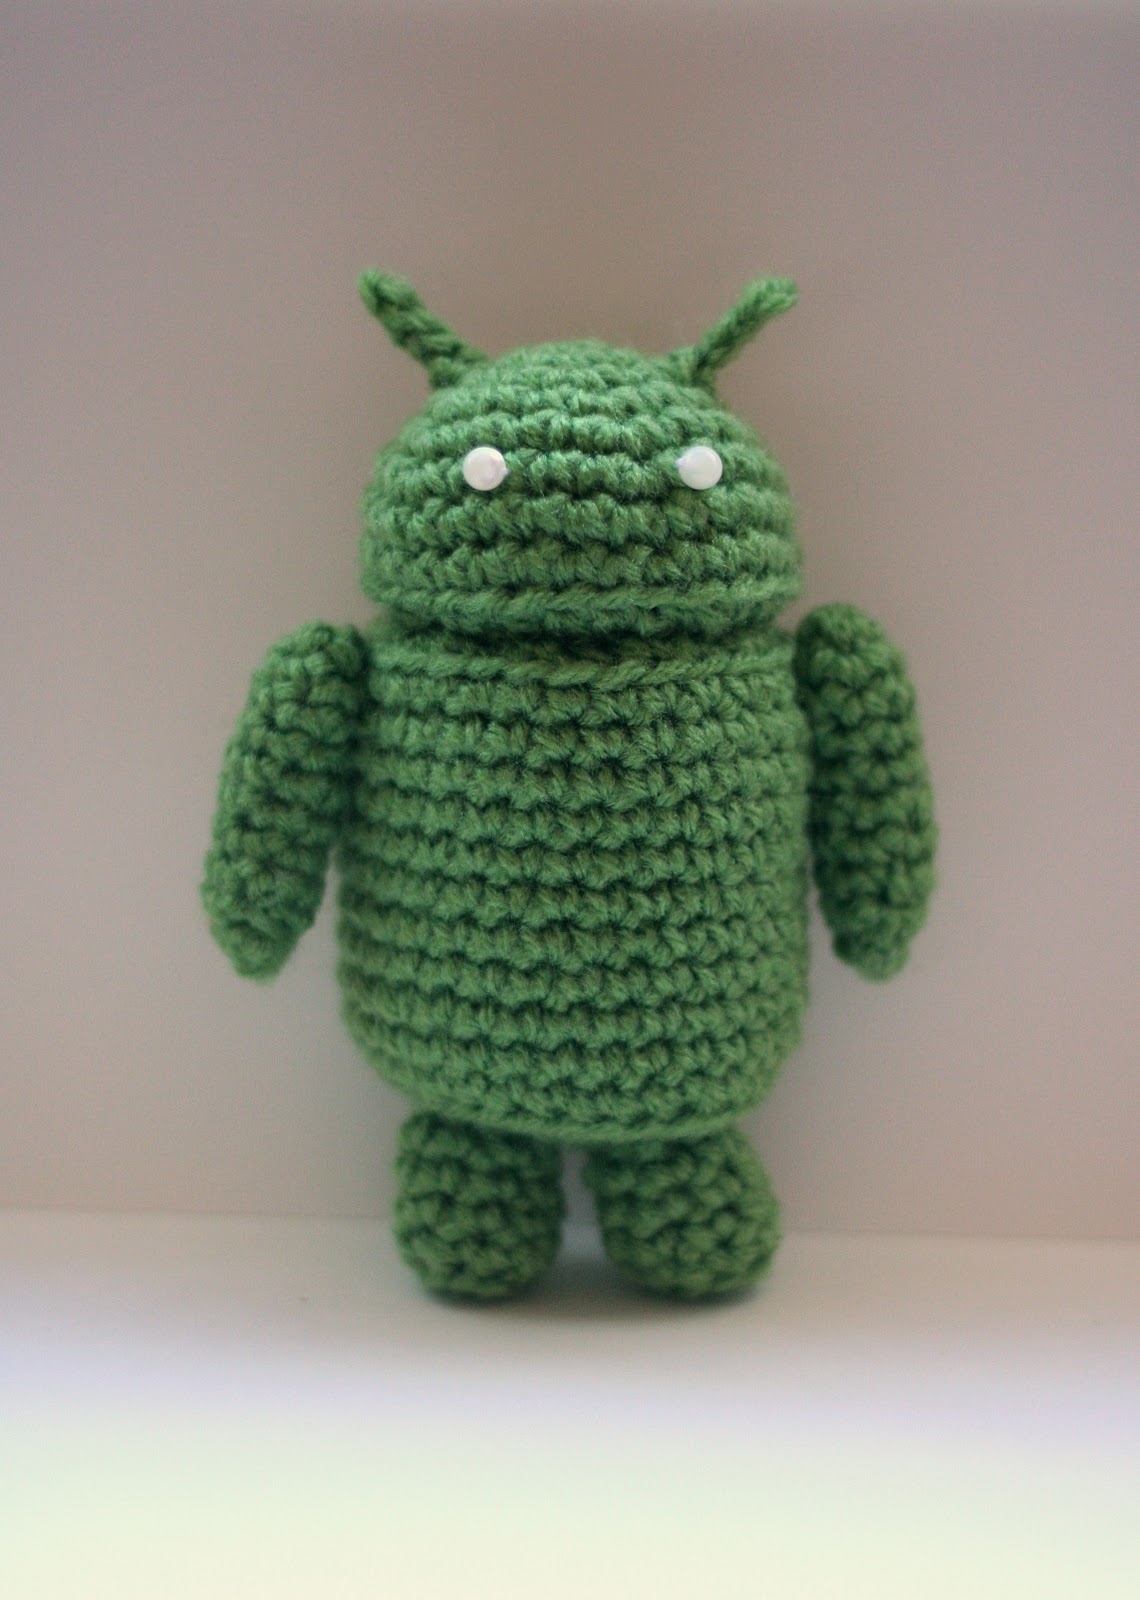
This was a super fun project. I started it for my husband but after a few revisions I feel the little dude is ready to make his appearance. My husband loves his Google Android phone and here’s my version, in crocheted amigurumi form, of the Google Android logo.

This dude is available for sale in my store here. The Jingle Turtle that I blogged about before is also on my store website for sale and hopefully, you’ll see a few more new products soon.
Droid Robot
patternH hook
Super Saver Yarn “Tea Leaf” color
My finished product is about 5 1/2 inches tall
Head
Row 1: 5 sc in loop, tighten
Rows 2: 2sc in each around (10 total)
Row 3: sc, 2sc, repeat around (15 total)
Row 4: sc, sc, 2sc, repeat around (20 total)
Row 5: sc, sc, sc, 2sc, repeat around (25 total)
Row 6: sc, sc, sc, sc, 2sc, repeat around (30 total)
Row 7-8: sc even around, sl st instead of sc for the last stitch of row 8 (30 total)
Row 9: sc blo, sc blo, sc blo, sc 2tog blo, repeat around (24 total)
Row 10: sc, sc, sc 2tog, repeat around (18 total)
Row 11: sc, sc 2 tog, repeat around (12 total)
Stuff head, but not so much that the bottom of the head bulges, you want it to be flat.
Row 12: sc 2 tog around (6 total)
Sew up hole and sew on eyes.
Antenna, join yarn to head with sl st, ch 4, sl st in 2nd ch from hook and in next 2 chains, join to head with sl st.
Body
Row 1: 6sc in loop, tighten
Row 2: 2sc in each around (12 total)
Row 3: sc, 2sc, repeat around (18 total)
Row 4: sc, sc, 2sc, repeat around (24 total)
Row 5: sc, sc, sc, 2sc, repeat around, sl st instead of sc in last stitch of row (30 total)
Row 6: sc blo around (30 total)
Row 7-16: sc around, sl st instead of sc for the last stitch of row 16 (30 total)
Row 17: sc blo in each next 3, sc 2tog blo next repeat around (24 total)
Row 18: sc in each next 2, sc 2tog next repeat around (18 total)
Row 19: sc in next, sc2tog next repeat around (12 total)
Stuff, but not so much that the bottom and top bulge out.
Row 20: sc2tog around (6 total)
Sew up hole.
Arm (Make 2)
Row 1: 3 sc in loop, tighten
Row 2: 2sc in each around (6 total)
Row 3-9: sc around
Stuff.
Row 10: sc 2 tog around
Sew up hole.
Legs (Make 2)
Row 1: 8 sc in loop, tighten
Row 2: sc blo around
Row 3-5: sc even around
Fill with dry beans or put metal nuts or washers in the bottom of the foot, then fill the rest with beans/stuffing, sew to body.
(Many thanks to the anonymous commenter that suggested the metal washers/nuts in the bottom of the feet to help Android stand!)
Sew all his robot parts together and he’s done!
I love the little Android robot and not only because I love my Android usin’ phone! I added this pattern to my favorites, I want to make one.
This is so cute!
This is so cute and looks just like it!!! awesome job!
Thanks!
omg! love love this. dang i wish i had your skills!
Great job!
Cute! Please make a video I’m learning to crochet and the video would help me a lot! 😛
Awwwwwwwwwwww!!! Love it!!! <3 <3 <3
Cute, my dad would haved loved this little dude.The big burly biker looking guy that he was.He used to teach the ladies to crochet at the Warren Mich Italian Cultural Center. He was irish.He would be very imprressed with your work and he would be home starting one and improving on the stand feature right now.Or maybe he would sew in plastic canvas on the feet bottoms to make him stand flat.Anyhow he is gone to heaven and I can almost hear him laughin at this little android bot.Great job
Yes yes yes!
Forget those hats and slipers! This is what my wifey needs to make me. (The scarfs are ok too though)
SOOOO adorable!! 🙂
Thanks everybody! I’m flattered. 🙂 Have yet to do video tutorials. I’m usually writing my patterns and crocheting them whilst homeschooling my 6 yr old and running after my 2 year old etc. That would make a good video though. We’ll see. For now you can probably find a good amigurumi tutorial on youtube to help with the basics. Or search for how to read crochet patterns. Good luck!
Thanks for sharing!! where we can see your videos?
love it and linked it
How tall is this little guy?
@Terry- Your dad sounds like an awesome guy! Currently working on the standing issue. Trying bingo chips inside his feet 🙂
@Brett- lol
I don’t have tutorial videos… at least none yet but youtube has gobs of crochet tutorials so you should be able to learn what you need to know from there.
@Erin- He’s 5 1/2 inches tall.
Thanks all!
Very, very useful and original! I’m going to try ^___^.
Also I’d like to translate your pattern into spanish and share it at my blog, do I have your permission? 🙂
Greetings!
Hello Ami Could you please give the link with the instructions in spanish?
What does blo stand for?
blo= back loop only. Usually when crocheting you put your hook through both loops of the stitch below and then draw a loop through them. With blo, insert your hook only into the loop furthest away from you. The front loop that is left makes the nice ridge at the Droids angles. Hope that helps! 🙂
Zomg i love this xD
I was want one. hmm i really might have to buy one haha. We will see ^^
Either way really nicely done.
Love when Gizmodo shows things like this haha
I love him and my son wants him! Where did you get the yarn?
Would there by anymore of this lovely crochet that I can purchase? It’s sold out…
@Lenny- I’m working on making more and hope to have some more available soon! You can contact me from my store at bethsco.com and then I will email you when they are in stock!
Hey Beth–What is the weight of the yarn? Where did you get it? I want to get started making it for Valentine’s Day!
It’s worsted medium weight 10 ply yarn. You could use any weight yarn with an appropriate size crochet hook! It will just affect the size of your finished product. Got the yarn I used from Walmart. Though I’m sure most craft stores would have it too.
Hello, I put a link to this page on my craft website called http://www.ladybugmarkets.com. Thanks so much for the free pattern! You did a great job!
Jennine
@Ami- You can certainly translate it to Spanish if you’d like and put it on your blog with a link to my blog and store. I’d love to be able to post the Spanish version on my blog too. Thanks!
Made this with bedspread weight thread, since I’m just that kinda guy. He turned out 2.25 inches tall and 1 inch wide. The pattern matched exactly, but I used different feet so that I could stuff them better.
http://www.facebook.com/photo.php?pid=7978740&l=c3f9ecec2c&id=749067058
He is chilling in a small flower vase that is filled with the same beads that I stuffed him with.
Wanted to test out my new .04mm needle and some sewing thread to see if the pattern holds, but I need to get some green thread first.
Kudos! My Google Android Team hubby sent me this url and is now saying it didn’t MEAN he wanted me to make him one… I a knitter that knows how to crochet… looks like I’ll be a happy hooker for this cute lil droid!
Beautiful, thank you!
I finished! thanks!! I love it http://a6.sphotos.ak.fbcdn.net/hphotos-ak-ash1/180158_498103050387_647970387_6619901_5937625_n.jpg
This guy has been popular at my office, and I am being asked to make a few more, with thumbs…
May I know how much yarn it took? Thanks!
@Saresha- Yes! It takes about 1.2 oz of yarn, or 32g of yarn which is about 1/6th a skein of the yarn I get.
I’ve been crocheting for a little over 3 years, I tried crocheting this Android for my boyfriend but mine doesn’t look right. How did you attach his arms? Email me at [email protected] and I’ll send you a picture of mine, thanks-Noah
@noah- I emailed you, but for anyone else having this problem I’ll sum up here. You want to hold the side of the arm to the side of the body where you’d like it fastened. Then sew the upper part of the side of the arm to the side of the body.
My son is an Android fanatic. I couldn’t resist making this. I haven’t crocheted in over 22 years. What a thrill to have made it and he was ecstatic with it! I decided to go ahead and use a metal washer in the feet and he stands perfectly on his own! 🙂
Can you post a picture to see how you use the metal washer? thanks!
Super cute! I love this so much~!
http://www.facebook.com/album.php?aid=2114651&l=6b1aa92bd1&id=1196533148
Here is the the little guy I made. I made the feet bigger and just shoved two metal washers down in the bottom of the feet to make a flat bottom and then filled the foot with beans.
Thanks for the picture!! <3 love it good idea! 🙂
Funny little plush bot.
– Robot Betty9
I love this. I haven’t crocheted in ages. Now I have an excuse to go back. Thanks 🙂
I have a question. I have only crochet for about a year and so I am still very new to this. The first step says 5sc in loop. Is that using a magic loop?
I didn’t use the magic loop, I made 2 chains and made the 5sc in the second chain from hook 🙂 good luck!! 🙂
The magic loop is what I use. 🙂
Okay thank you so much!! =)
I made a girl droid for my gf as a part of her birthday present:
http://www.android-hilfe.de/attachments/android-allgemein/32560d1302979187-allgemeine-diskussion-zum-news-flash-nummer-4-2011-img_1091.jpg
That’s great! I wish my husband would do something awesome like that! 🙂
what is sc “blo”? thanks!
blo=back loop only
thank you! 🙂
Nice to read about your post.This is one of the unique post.I like your blog clarity.
Android app developers
Much thanks for posting the pattern. Been looking for a good one for a while now. Will have to make a few of these as gifts for my nerd friends! 🙂
Hi. I just wanted to let you know that someone has taken your pattern and is selling it on Etsy as their own creation.
http://www.etsy.com/listing/93709394/droid-robot-amigurumi-pattern-crochet
I have sent a polite complaint to Etsy and to the seller asking that this item be removed. This particular person has also taken the original designs of others and is selling them.
Thank you for letting me know! Several others messaged me too and I’m blessed that people are getting my back. While I’m slightly flattered to have made something maybe worth stealing… it’s not ok with me. It looks like the seller “went on vacation” for now after being pestered by fans of the true authors of the patterns. Thanks again for protecting my work! I like making my patterns available for free and won’t stop. 🙂
I’m gonna flag that thief!! -.-
Bethany you can report that thief to Etsy, I just did it http://www.etsy.com/shop/hugzandstitches just click Report this shop to Etsy and that’s it, Good luck!!
Thanks, Corina. 🙂
Thanks for this tutorial! I just made a cute little android. It’s here if you would like to see it: http://tintaelinha.blogspot.pt/2012/07/android.html
LOVE this project + your version of the little Android! Thanks SO MUCH for sharing your projects, patterns + pics! God Bless! 😀 I bookmarked your site for future reference + will TRY to figure out how to post it onto my Facebook to share with Crochet + Crafty Friends! 😀